
The Chartist Turnkey Code RealTest Setup Guide
This is a short guide on how to set up and run your RealTest Turnkey Code. It is not a general guide on RealTest. The official comprehensive and constantly updated user guide can be found here and general RealTest questions should be directed to the RealTest User Forums, where a lively user community exists.
If you do not yet have a copy of RealTest, a free trial version can be found here.
First Use
The RealTest software is incredibly user friendly. The code can be saved, opened, and run from anywhere on your file system. By default, however, there is a scripts folder within the RealTest installation folder, located at C:\RealTest\Scripts to which the code can be saved.
We highly recommend creating a backup of any turnkey code before continuing.
To open the code, simply double-click the saved .rts file, or open it through the RealTest file menu.
An Explanation of the RealTest Script Layout
Coding in RealTest is clear and orderly; functions are excel-like and usage requires little knowledge of traditional coding. Scripts are separated into headers with related items underneath. For example, all external data import settings fall under the Import header. This layout ensures code stays orderly and readable, and will not get out of hand.
You can view all the available headings here.
Configuring The System
Data Install
The Chartist recommends using Norgate Data for system development and backtesting purposes. Not only does Norgate provide the highest quality of data we have seen, but it integrates seamlessly into RealTest with no installation required; Norgate Data Updater must simply be open at the data import step (explained later). RealTest supports a variety of data sources, including Norgate, Yahoo, Tiingo, MetaStock, and CSV files. For specific steps on integrating non-Norgate data, view the RealTest User Guide.
The Import Section
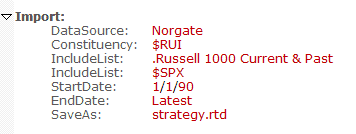
The Import header is used to define the data that will be used in backtesting and analysis.
To set your data source, simply change the DataSource field under the Import section.
The IncludeList function is used to define the data that will be imported; this can be in the form of a Norgate data watchlist, a comma separated list of symbols, or a path to a CSV file. Some Chartist Turnkey Code files are set to point to custom Norgate watchlists and this is noted in the code. You can either create a custom list with the same name with Norgate Data Updater or change this field to match an existing list.
The range of data imported is set using the StartDate and EndDate fields; note this is separate to the testing date range which is defined later.
Order Settings

The OrderSettings section is where we set all the options regarding order generation and placement.
The EndDate field defines when the orders are to be generated for. If you are running a live system, you should set this to latest.
OrdersMode specifies the format of the resulting orders output. If this is not specified, the output will be a simple text list. The turnkey systems have this option set to Template, which uses a csv file to format the output.
The default RealTest installation includes templates for both The Chartist API and Interactive Brokers Basket Trader. Default templates are saved under C:\RealTest\Scripts\Examples and selected using the OrdersTemplate field. These can be set as follows:
- OrdersTemplate: Examples\chartist_api_template.csv
- OrdersTemplate: Examples\ib_basket_template.csv
Alternatively, a custom order template can be created using these instructions.
An OrdersFile field can be added to automatically save the resulting output.
The HolidayList field is used to specify holidays in the locality. Automatically updated holiday lists for the US and Australia exist within C:\RealTest\Scripts\Examples. The HolidayList field should point to one of these, or a custom file created.
Note: a trade management tool called OrderClerk is included in the RealTest installation. This is used to interact directly with Interactive Brokers, placing orders and recording trades. OrderClerk is beyond the scope of this document. You can find out more about OrderClerk here.
Running The System
Import The Data
Upon opening the file and before running any tests or order generation, data should be imported using the import button in the top toolbar.
RealTest uses a unique method of importing data that significantly increases the speed of backtesting and analysis. Data is imported from the external data source, into the computer’s memory, where it can be processed significantly faster. This means that a data import should be run only once each time the code is opened, or when the dataset needs to be changed/updated (i.e. you have changed the watchlist).
Testing
Once the data is imported, a backtest can be run by simply clicking the Test button on the top toolbar. Test summary results are displayed in a separate tab or floating window. Multiple tests can be run and displayed in this output window, making test comparisons easy. Double clicking the test summary will open a separate window with in-depth results and graphs.
Producing Orders
Data must be imported before producing orders. This ensures that all new data is included in the order generation.
Position sizing is managed by the Positions and AccountSize fields.
Assuming the OrderSettings fields have been set up appropriately, an order list can be generated by simply pressing the Orders button on the top toolbar.